|
All Saito engines (at least those sold in the US) except one version of the 300 twin, use muffler pressure with no pump. A pump will provide uniform fuel flow from full to empty and in some cases permit placement
of the tank near the center of gravity of the model. However there is no need to use a pump if you have a tank just behind the engine near the same level as the carb, and the tank is not greatly oversize; the
engines work very well like this with muffler pressure alone.
If you are a new flyer, or just fly slow scale models, you would have no need to consider pumps; the standard Saito setup as explained in the engine instructions booklet with muffler pressure is fine and
trouble-free; use a fuel tank that is an appropriate size, with a location close to the engine, use muffler pressure, forget pumps, and don’t bother with the information on this web page --- you will
likely be very happy. On the other hand if you have an unusual fuel tank setup, or want very reliable fuel flow for extreme aerobatics this page might be right for you. A properly setup pump can provide
extremely reliable and consistent fuel delivery. A pump can make an already well-setup engine even better, but it won’t cure basic engine problems such as carbs that leak air, blocked filters, kinked fuel
lines, etc.
1. Fuel Regulators
(a) The Cline Pressure regulator: This is not actually a pump but a pressure regulator and a good option instead of a pump or straight muffler pressure. I have used
it successfully. This works fine although it can be confusing for some people to set up. A one-way valve is used in the exhaust pressure line to increase the tank pressure to a value of a few pounds per square
inch; the tank pressure needs to be at least 2 pounds. A pressure regulator is inserted in the fuel line just before the carb. The function of the pressure regulator is to allow the engine to draw fuel as
needed. The advantage is that the tank position is not critical. The disadvantage, although not major, is that the tank is pressurised at fairly high pressure and if something goes wrong with the pressure
system, (eg pressure line comes off muffler) then the engine will probably quit. The plumbing is somewhat more prone to failure in my opinion compared to other options. I instead prefer the Perry pumps as they
do not require a muffler pressure line, however the Cline system is an excellent method if you want the tank back at the center of gravity far from the engine. If you want more information on this option check
out this URL: http://www.billsroom.com/pcfs/fuelsysdesc.htm
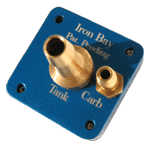
(b) The Iron Bay Regulator:
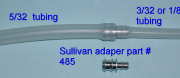
This works the same as the Cline system but is made by a different company. A difference is that the line from tank connects on to a fairly large diameter nipple on the regulator; this is probably an advantage if you want to use large diameter tubing (eg 5/32 ID) from tank, but a minor disadvantage of you want to use thinner tubing (eg 1/8 ID), however the Sullivan tubing adapter can easily solve that problem (see picture below).
The Iron Bay web site is
www.ironbaymodelcompany.com/index_files/Page438.htm (Note: as of early 2009 this URL does not
work; it is not known if the Iron-Bay company is still in business)
The advantage of the above systems is that fuel will not run through them when the engine is not running. If
you have a tank that is considerably higher than the engine, with the standard muffler pressure setup, or the Perry pumps mentioned below, fuel will run downwards into the engine when the model is parked and
flooding is possible. This does not happen with the Cline type regulators
2. The Perry VP-20 Oscillating Pump: I have used this pump with the 50, 56, and 91 engines and seen
it work fine with a 150. It can be mounted on the firewall just behind the engine provided you don’t use a
very soft mount, and it is not necessary to use the mounting plate provided with the pump If a very soft engine mount is used the pump should not be mounted on the firewall; in this case the pump should be
mounted on the engine, or part of the engine mount that vibrates with the engine, because the pump uses
engine vibrations as its power source. The best place to locate the pump in my experience is horizontally,
parallel to the ground, on the firewall just behind the engine, about 2-3 inches below the crankshaft level. If
you choose this pump the tank is best located just behind the engine, although I believe it should pump from
a longer distance. The advantage of this pump is the uniform mixture from full to empty tank. It is useful in
certain scale model designs that do not permit locating the tank near the same level as the carb. There is a
pressure adjustment on the pump. You should first run the engine on muffler pressure. Then after connecting
up the pump readjust the main needle valve; if it is more than about 1/2 - 3/4 turn different from when you
had muffler pressure then adjust the pump pressure appropriately so that the main needle valve setting is
within 1/2 turn of the situation when you had muffler pressure alone. I have successfully used this pump both
with and without muffler pressure, although the instructions do not suggest using muffler pressure with this pump. If you do not use muffler pressure with the pump the vent line to the tank must be open to the
atmosphere. This pump will not fix a problem with a poor tank location where the tank is much higher than the carb as fuel will run down into the engine and cause difficult starting.
3. The Perry VP-30 Pressure Pump: This is a pump and regulator driven by pressure pulses from the
crank-case. A short (abour 2”) length of fuel tubing is connected from the crankcase breather to one arm of
a T-joint, The other arm is connected to about 4-6 “ of fuel tubing and is left open to the atmosphere. The
remaining open line on the T-joint is connected to the pump pressure input via the red tubing that comes with the pump. For the newer pumps that are adjusted with a hex tool, leave the screw where it is and try
running the system without any screw adjustment. Note: When using this pump, the tank vent must be open to the atmosphere, and no muffler pressure is used. The crankcase remains open to the
atmosphere for excess oil to drip out.
This pump will not work well if the tank level is far above the carb level because fuel will run down
into the carb through the pump; this is common for inverted engines. in most models.
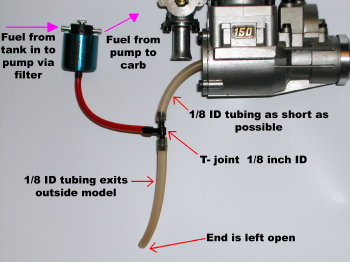
The T-joint should have 1/8 inch inside diameter (or larger). The red plastic tubing from the pump to T-joint
is supplied with the pump; it helps to heat the end of this red tubing with a heat gun to get it onto the T-joint.
Here are examples of some setups that have worked for me with the Perry pressure pump.
- Saito-91, engine inverted, 1/8” tubing everywhere, standard tank that came with the kit (a Kyosho Sensation). Tank located back over the CG.
- Saito-120, engine upright, 1/8” ID fuel tubing everywhere, standard unmodified 18oz Graupner tank. Model is a Sig 4star-60. Tank located back over CG.
- Saito-150 (inverted and side-mounted), Saito-180 side-mounted. Standard unmodified 18 oz Graupner tank located up front just behind firewall. 1/8” ID silicone tubing from tank to pump and
pump to engine.
When setting up these pumps, check for air bubbles going into the carb from the pump. If there are no air
bubbles going into the pump but air bubbles coming out the pump, the pump is leaking and needs replacing.
If you find that the engine is too lean at full-throttle, and you can not richen it up sufficiently with the main
needle valve, the pump may not have sufficient fuel flow; in this case the pump also needs replacing. In the
unlikely event you have a defective pump, I suggest sending it back to Gary Conley for a replacement. I have spoken with Gary and he is dedicated to provide a quality product. All the pumps now produced are
rigorously tested before shipment.
A problem with these pumps can be finding a place to mount them. Below is a Saito-120 in a SIG Four Star-60 model. The pump is mounted on the side of the model (not too elegant). You can see the fuel filter
(on the pump input line) mounted on the model adjacent to the engine. The pressure inlet to the pump is the
red tube that goes through the hole in fuselage to the T-joint inside behind the engine. The model has the
tank located at the center of gravity position over the wing. This setup has worked very well for over five years without ever adjusting the pump or carb. The pumps don’t seem to wear out and provide very
reliable fuel flow. They are my favorite because the tank remains unpressurized and no muffler pressure tap is required.
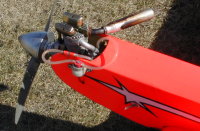  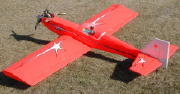
The photographs above show a Saito-120 in a SIG Four-Star-60 with a Perry VP-30 pressure pump mounted on the side.
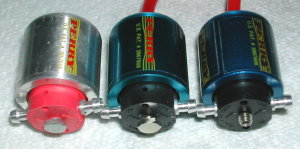
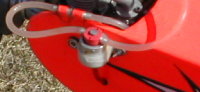
The above picture shows three versions of the Perry pump. The one on the left with red plastic and silver body is the original version made by the Perry-Varsane company. Later Conley Engines began making
these pumps and changed the external appearance (see pump in the middle of the above picture) to have black colored plastic and a blue colored body. Both the original red Perry pump and the early Conley
versions used a hex shaped adjustment screw. Recent versions (see pump on right side in above picture) use a different adjustment screw. The newer pumps have a screw that is easier to adjust by inserting a hex
tool into the screw. I strongly suggest using the new version with the hex adjustment screw as shown on the right side of the above picture.
4. The Saito Pump System:
 
Currently the only Saito engine sold in the US with a fuel pump is a version of the 300 twin. Saito have also made a 120 and 150 with a pump. These were formerly sold in the US but the importer (Horizon Hobby)
ceased importing them. I am unsure if they are still manufactured. This text is therefore probably only relevant if you have an older engine with this pump system, however since the pump system is available as a
separate item it may be feasible to convert a new 120-150-180 engine to use this pump but I have not
tried it myself. The pump system formerly supplied with the special versions of the 120 and 150 engines is the same pump system supplied with the current Saito-300 twin. The Saito-220 is also planned to use the
same pump system, however the standard version of the Saito-220 sold in the US now does not come with the pump.
The system works via tank pressure. The rear crankcase cover has two vent nipples each containing one-way valves. One valve allows fresh air into the crankcase, the other valve is reversed in direction and
pumps air out of the crankcase to the tank via a needle valve assembly. The needle valve may be adjusted to bleed off pressure such that the tank pressure may be varied by turning the needle valve. It works
extremely well and the tank pressure remains remarkably constant. The difficulty with this system was the abysmal lack of instructions and I suspect most people set it up with too much tank pressure. For my 120
and 150 engines the needle needs to be turned a long way out so that the tank pressure is no more than about 1-2 pounds (psi). I have found that a pressure of about 0.5 to 1.0 psi is ideal for the Saito-120 and
150. The Saito factory instructions with these older engines suggest the pressure adjusting needle valve
should be opened 2 3/4 turns; I have been unable to get these engines to run with this pressure setting and
had to reduce the tank pressure by turning the adjustment out about 5 1/2 turns to get about 0.5 - 1.0 psi
tank pressure. The actual value of the pressure is not important if the engine runs OK. It is most convenient
to measure the tank pressure by temporarily connecting a pressure gauge via a T-joint into the fuel line just
before the carb. If you do not have a pressure gauge I suggest turning the needle out about 5 1/2 turns and
try it. If it seems way too rich at mid-range try lowering the pressure by turning out the needle about 1/4
turn. If the pressure is too high the mid-range will be excessively rich and the engine unreliable. You should
experiment with different tank pressure settings to find a value where the carb adjustments permit reliable engine performance. The usual problem with this pump is users setting the pressure too high. I would
appreciate hearing from anyone who has successfully got one of these engines to run with the recommended 2 3/4 turns on the pressure adjusting valve. You can buy the pump package from Horizon Hobby, that
contains the pump needle valve assemble plus the two one-way valves; it is Saito part number ‘300TTDP-102’ and is also provided with the pumped version of the 300 twin in current new engines.
Note: Although this system pressurizes the tank from the crankcase, very little excess oil from the crankcase seems to go into the tank. The engine crankcase is still effectively open to the atmosphere
through a one-way valve that lets fresh air into the crankcase, another one-way valve from the crank-case connects to the pump needle valve assembly and most excess oil drips outside through the pump assembly
drip tube shown in the above diagram.
For the Saito-150 DP with the Saito pump system, here are my settings that work. Pump needle valve turned out 5 1/2 turns; this results in a tank pressure of a little more than 1/2 psi (Note: 5 turns out was not
satisfactory, the extra 1/2 turn was significant). Main engine carb needle valve turned out 2 1/2 turns. OS F
-type plugs, Byron fuel 15% nitro, 16% oil content (synthetic-castor blend). The 2 1/2 turns out on the
main needle valve is a bit rich; and may need changing to suit the particular fuel, weather, etc. The engine has a reliable low idle of about 1800rpm with an APC 16x8 or 17x8N prop..
Some Other Comments on the Saito Pump:
A major disadavantage of the Saito ‘pump’ system is that it is not easily possible to inject after-run oil into the crank-case after each flying session. In my opinion this is a serious drawback.
It seems that the old Saito-150 with Saito-pump would only work well when the pressure was adjusted to a relatively low value that is comparable to pressure values from mufflers.
The Saito-220 that is sold in Japan and Europe comes with the Saito ‘pump, and the engine is sold under the name “Saito-220 Zeus”. In the US the Saito-220 that is sold does not have the ‘Zeus’ label and does
not come with the Saito ‘pump’ and is sold with the same carb as the Saito-180. If you have the US
version it is possible to buy the pump, backplate, and larger carb as separate items to modify your engine
to be the same as the version sold in Japan; however some users have reported difficulties setting up this engine with the Saito pump... this does not imply there is a problem with the pump, but the additional
adjustments can be challenging for users..
|